BYO Search Engine with Google

If your web site uses a content management system, you probably have a built-in search tool that can find anything on your site. If you created your site using straight HTML, making the sight searchable isn’t as easy.  Now you can create your own site search engine using the power of Google.

http://www.google.com/coop/cse/

Search using the box above and you will see only links from my blog. Now use the search engine below. It will give search results from (all HTML) site on the UF server.

This could be a useful tool for teachers. A custom search can be created that searches an assortment of pre-approved sites. If you would like your students to find information about a curricular topic, a custom search can be created that is strictly limited to the sites that you have specified in your custom Google search.

Posted in edtech | Tagged , , | 1 Comment

TinyURL

I don’t know why I haven’t used this free resource before.  Today I was helping my wife with a presentation she is giving to a group of high school students that are thinking of becoming teachers.  She showed me the URL for ODE’s teacher licensure information.

http://www.ode.state.oh.us/GD/Templates/Pages/ODE/ODEPrimary.aspx?Page=2&TopicID=1222&TopicRelationID=1283

Can you believe that?  ODE re-did their web site last year and now most of their URLs are more than 80 characters.  For comparison, look at these nice short licensure URLs:

Arizona – http://www.ade.state.az.us/certification
Florida – http://www.fldoe.org/edcert
Indiana – http://www.doe.state.in.us/dps

Unfortunately we are stuck with that huge ODE link here in Ohio.

What if I could shorten it to

http://tinyurl.com/2ayfzy

That’s what TinyURL does.  Best of all, it is absolutely free.  You don’t even have to give them your email address.  You can go there right now with your super long URL.  Paste that URL into the box.  Your new 18 character URL will be generated.  That URL will never expire.  You can distribute it to as many people as you like and it works forever.  If you ever forget that URL, create a new one.  It takes five seconds.

BTW – Once you put a long URL into TinyURL, it will remember the associated short URL.  If you take ODE’s ridiculously long URL and put it in right now, it will give you the same short URL I provided above.

Tagged , | 3 Comments

How did I do that?

 howdididothat.png

If you watched the video I posted yesterday, you may have asked yourself how the movie was created.  Let me explain a couple of things.

1 – I recorded my voice during the eTech Ohio 2008 conference using a digital voice recorder (Panasonic RR-US395).  When I got home, I dumped the recording to a WAVE file using the Panasonic software.

2 – I recorded a “screen cast” of my presentation at home using Windows Media Encoder and saved that as a movie file with no sound.

3 – I used MovieMaker to combine the WAVE file with the screen captured video of my PowerPoint.  The final movie was exported as a WMV and uploaded to TeacherTube.

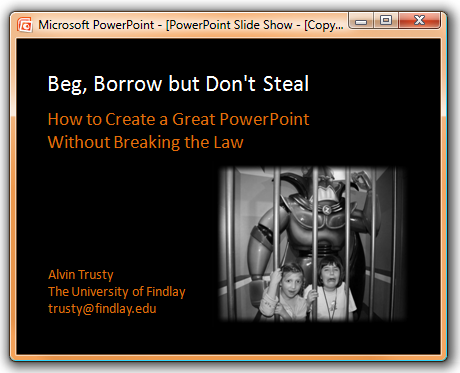
To keep the file size to a minimum and reduce the effect of compression anomalies, I did the screen capture in PowerPoint at the approximate resolution of a TeachTube video (320 x 240).  The graphic at the top of this post is a screen shot of the presentation (close to actual size).  I used Windows Media Encoder to create a movie of that small window instead of the normal full screen PowerPoint.  You can adjust PowerPoint to play in a small window in the Show Setup (screen below).

powerpointshowsetup.png

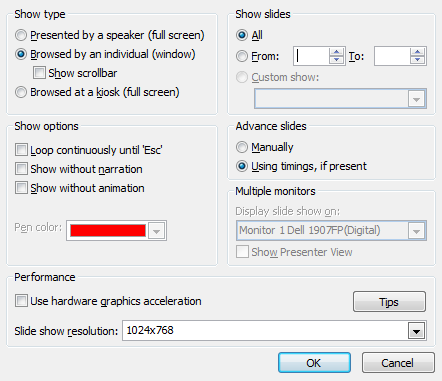
I selected the “Browsed by an individual” for the Show Type.

To create the movie, I had to listen to my recorded audio and advance the slides in the PowerPoint so my recorded voice matched the screen captured movie.  There were a lot of ways that I could have done this, but a real-time replay was the easiest and probably quickest.

Once I had the movie, I dropped it into MovieMaker and dragged the WAVE audio file in as the audio track.  I had to slide the audio back and forth a little to get it synchronized perfectly with the video.  That was it.

I could have placed my slides into a service like SlideShare.  I know they support audio now, but I’m not sure I could have used my recorded audio.  I would have lost all the transitions if I had used a service like SlideShare.  That alone was enough to deter me from that particular service.

I had a hard time getting to TeacherTube several times today.  I’m sure it was a bandwidth issue.  They definitely do not have the bandwidth of major non-educational streaming sites (YouTube, MetaCafe, Blip.tv), but TeacherTube is one of the few streaming sites that is not blocked by most K-12 school districts.

Posted in edtech | Tagged , , , | 4 Comments

eTech Copyright Law Presentation

It took me a while to get this online. The audio doesn’t sound great, but I think most of it is understandable. I’ll post something tomorrow to explain how I created this video resource.

Posted in copyright, edtech | Tagged , , , | 4 Comments

Making your blog CC

I switched blog servers a year or two ago and never updated the latest version to be licensed under a Creative Commons license.

The whole process is fairly simple. 

1 – Decide on the license you want to use.  I decided that anyone could use my work for anything except commercial use.  I don’t plan to make money with anything on my blog, but if someone does figure out a way to monetize this thing, they will have to get special permission from me to use my stuff.  That’s one of the nice things about Creative Commons.  Anyone can use my work for anything non-commercial, but if someone does want to go through the traditional process of getting my permission, they can (only with my permission) use my work commercially.

The list of Creative Commons licenses is here.

2 – Edit your blog footer.  This is little more complicated.  Start by copying the HTML from the Creative Commons license page.  All the HTML is provided.  High light it and copy.  Then open your blog’s footer.  You can find this in the dashboard under the Presentation menu.

Presentation – Theme Editor

and select Footer from the menu on the right side of the page.  See picture below.  Click for larger picture.

I have circled the link to the footer in the right menu.  When you click this link, the code for the footer will show up in the edit window on the left.  This is where the “be careful at this point” comes in. 

What I did to protect myself from a full meltdown is high light all the foot code, copy it and paste it into a Notepad file for safe keeping.  If things get totally messed up, that original code can be pasted back into the edit window.

To add the Creative Commons license code to your blog, find where the original copyright information is and delete it out.  In its place, paste the code from the CC site.  I have circled this in red in the picture above.  Click the Update File button to save your work.

3 – Take a look at your blog to ensure the footer is correct.  Remember, you can always go back to the original code if you need to.

Posted in copyright | Tagged | Comments Off on Making your blog CC